Softphone
1. Introduction
Softphone Executable will give you all the power to make calls to any online contact or a phone number, initiate ConnectMe Audio and Video calls, schedule conferences with others and much more. This help document describes the installation process and various features of Softphone executable.
2. Installing Softphone Executable
To install Softphone Executable locate and double-click the downloaded setup file on your local machine and click Next to continue.

Subsequently, Ready to Install dialog box appears. On successfully installing Softphone, the Finish dialog box is displayed to exit the Setup Wizard as shown below.

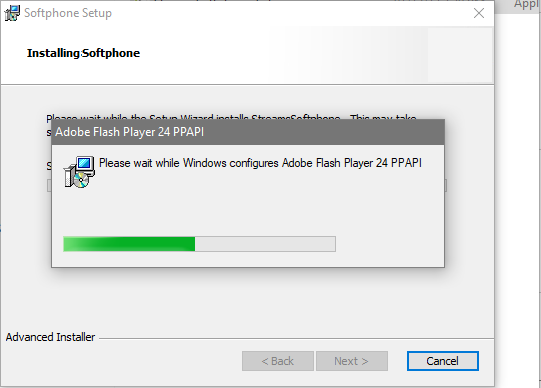
On clicking Install, the installation process dialog box is displayed. In the User Account Control that appears, click Yes to install Adobe Flash Player.
Note: Adobe Flash Player is a pre-requisite to play voicemails, call recording and other audio files.

On clicking Finish, it launches the Softphone Executable login screen.
3. Accessing Softphone Executable
To login to Softphone executable, double click the shortcut icon on desktop. Enter the login credentials and click Login button to login to Softphone executable.
Enter the login credentials and click Login to login to Softphone executable.

Sound and Camera Settings
The Sound and Camera Settings popup allows a user to select microphone and speaker for Softphone, microphone and camera for ConnectMe. When multiple devices are connected, default Microphone and Camera are selected only for Softphone. A Reload icon is provided to reload the popup content. If a device is connected when the popup is opened, on clicking Reload icon the device gets listed for the user to select.
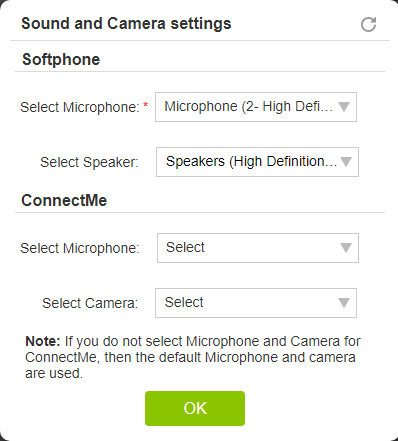
- If only one microphone and speaker is connected to the device, then that is considered as the default selected device for Softphone and the above popup does not appear.
- If no microphone is connected, then the above popup does not appear.
- If no Microphone and Camera is selected for ConnectMe, then default Microphone and Camera are used.
To change the Sound and Camera Settings for Streams Exe, right click the Softphone icon in system tray and select Sound and Camera Settings.
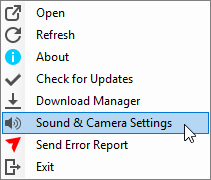
This opens Sound and Camera Settings popup as displayed below. Select microphone and speaker for Softphone, microphone and camera for ConnectMe from the drop-down. Click OK to save changes.
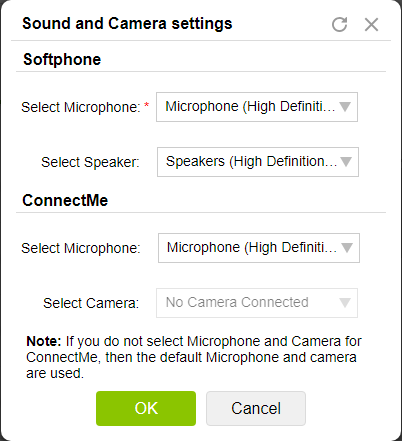
If no microphone, speaker and camera are connected and Sound and Camera Settings is accessed, then ‘No Microphone connected’, ‘No Speaker connected’ and ‘No Camera connected’ is displayed
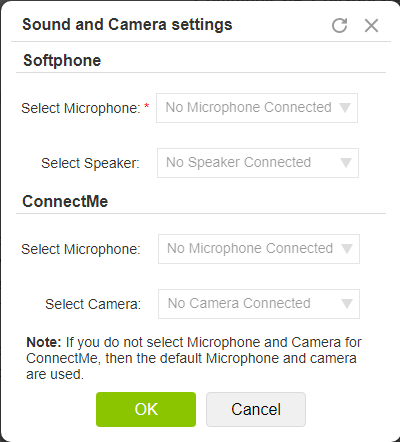
Selecting a microphone for Softphone is mandatory for the user to continue.
Note: The same settings apply to Full Streams Client also.
3.1 Overview
The Softphone executable displays Recents, Contacts and ConnectMe tabs. By default, Recents tab is selected. This displays recent inbound and outbound calls
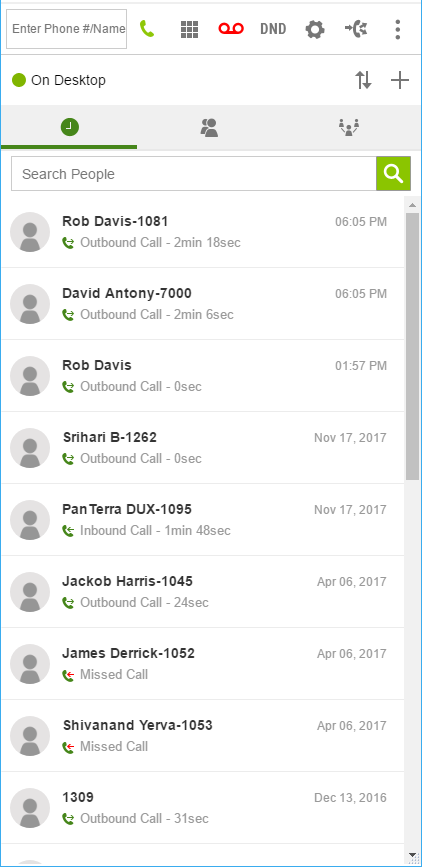
- Recents tab displays all recent calls- Inbound and Outbound
- Contacts tab displays Active calls, teams, company contacts, Other contacts and Imported contacts.
- ConnectMe tab displays already created ConnectMe sessions with options to start, edit, delete the session and re-invite added participants.
- Call an online contact or any phone number by clicking the call button against the name of the contact to select a phone from the CTC menu.
- Contacts tab gives access to Active calls, teams, company contacts, Other contacts and Imported contacts.
- Use Enter Phone #/Name text box to search for contacts and make a call.
- Make Blind and Supervised call transfer.
- Make Conference calls.
- Initiate ConnectMe Audio and Video calls
- Schedule conferences with others or start already created sessions from ConnectMe tab
3.1.1 Soft Phone Action Icons
- Dialpad :
 Click this icon to access Dialpad.
- VM :
 Click this icon to pop-out voicemail window just like in the UCC today.
- DND: Click this icon to enable Do Not Disturb that simply toggle DND status to Red color.
- CTC Setting :
 Click this icon to pop-out the CTC Settings page.
- Call Forwarding (Routing Plan) :
 Click this icon to pop-out the Routing Plan Page, where you can enable quick access to select current Plan or create/edit or delete plans.
- More Menu:
 Click this icon to popup More options menu with the following:
1. ULM : Select this to pop-out ULM in a new window.
2. Logout : Select this to logout of Softphone executable.
4. Calling a Contact
- Dialpad :
 Click this icon to access Dialpad.
 - VM :
 Click this icon to pop-out voicemail window just like in the UCC today.
 - DND: Click this icon to enable Do Not Disturb that simply toggle DND status to Red color.
- CTC Setting :
 Click this icon to pop-out the CTC Settings page.
 - Call Forwarding (Routing Plan) :
 Click this icon to pop-out the Routing Plan Page, where you can enable quick access to select current Plan or create/edit or delete plans.
 - More Menu:
 Click this icon to popup More options menu with the following:
1. ULM : Select this to pop-out ULM in a new window.
2. Logout : Select this to logout of Softphone executable.
To call a contact, enter the name of the contact in the search bar. From the search results that appear, rollover the contact to call and click Call button as displayed in the image below.
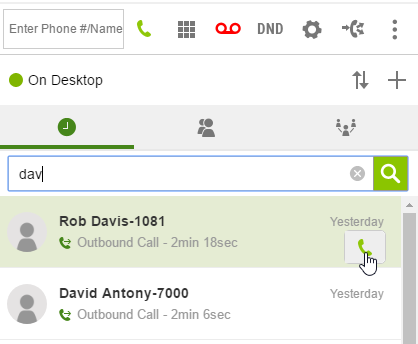
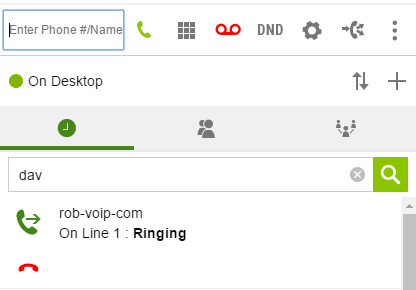
Clicking Call button will initiate the call and Call From popup is displayed.
Note:
- If 'Always pop up list of registered devices' is selected, then all registered devices are displayed. Select a phone to call selected contact.
- If a particular phone is already selected, then the call is routed using the selected phone.
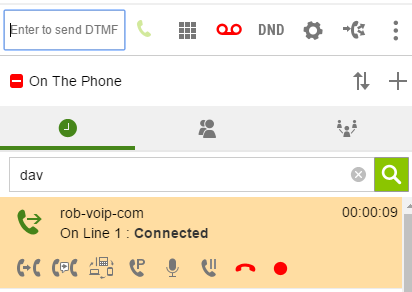
4.1 Putting a Call on Hold
To put a connected call on hold, click the Hold icon. On clicking Hold icon, the call is put on hold as shown in the image below.

4.2 Call Park
To park a connected call, click Call Park icon. On clicking Call Park  icon, the call is parked.
5. Enter Phone Number/Name Field
The Enter Phone #/Name field enables you to make an Outbound call. Clicking Enter Phone Number/Name, the text field is displayed as shown in the image below.

Entering number or typing user’s name in the Text Box display all matches in your account as shown in the image below.
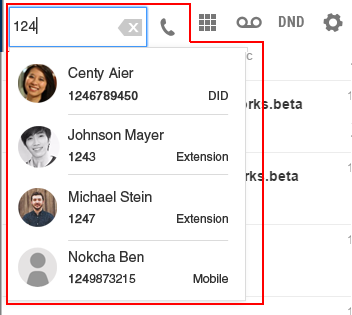
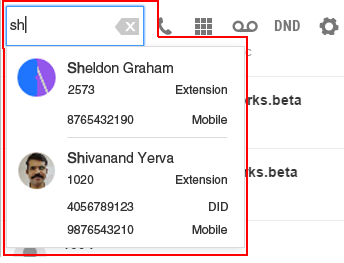
Note: As you enter digits/letters, it searches for contacts that match. If you see the number you want to dial, click it to place the contact number in text box without entering the rest of the number. If you see the number you want to dial, click it to place the call to the contact number without entering the rest of the number.
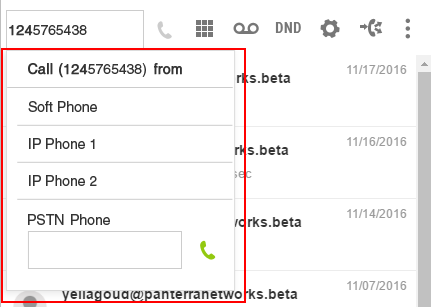
On clicking the contact number, the 'Call From' menu is displayed with all your registered devices as shown in the image below.

Select a device to call from or enter your PSTN phone number and click call icon to an initiate outbound call.
Note: Call From menu is displayed when you select “Always popup list of Registered devices” in CTC settings.
6. Initiating Blind and Supervised Transfer
6.1 Connected Call Legends
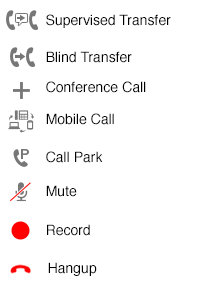
6.2 Initiating Blind Transfer
Blind transfer can be performed on a Connected call to a PSTN user or an extension in different ways:
By clicking Blind Transfer  icon.
icon.

Clicking Blind Transfer  icon puts the connected call on hold as shown in the image below.
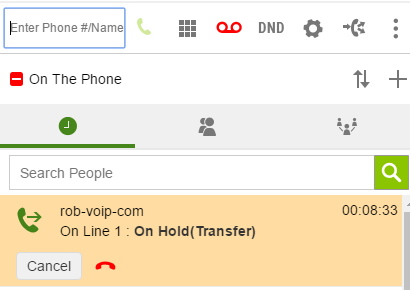
Enter name in the text box and click the number to transfer the call.
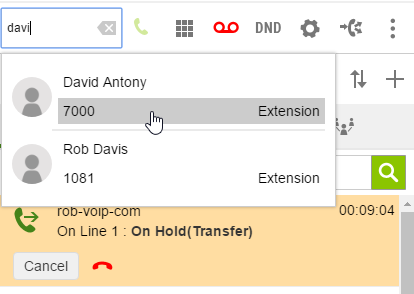
Or by entering user extension/ PSTN number in the text box and click the Transfer button.
Alternatively, you can also click the Transfer icon that is displayed on hovering over the contact as displayed below.
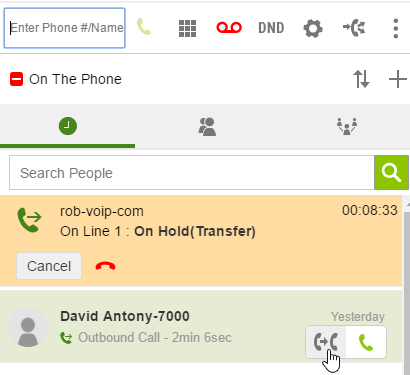
6.3 Initiating Supervised Transfer
To warm/supervised transfer a call by seeking other's consent, click Supervised Transfer icon. The text in softphone changes to Enter Phone No#/Name.
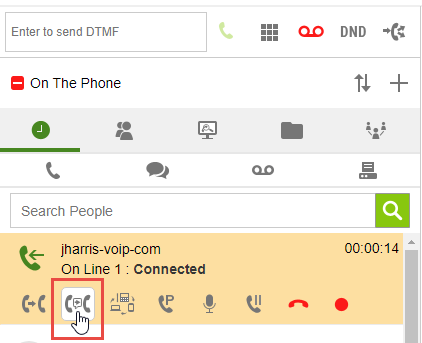
Call the other contact to whom you would like to transfer the connected call. Enter the user’s extension or roll over the user to whom the call is to be transferred and click Call button. The call is now displayed in Recents as displayed below.
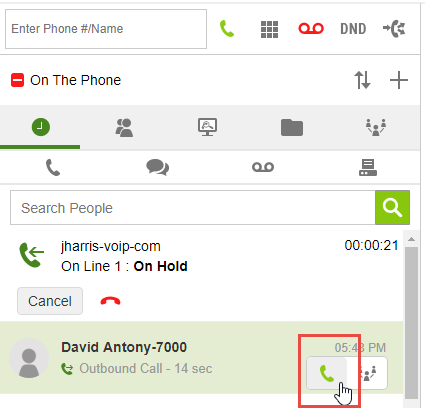
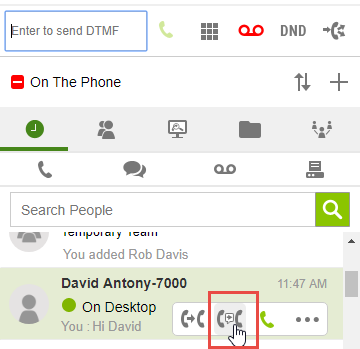
Alternatively, you can also rollover the contact to transfer the call and click Supervised Transfer icon as highlighted in the image below. This action will initiate a call to the corresponding user.
Once connected, the call is displayed in Recents as displayed below. To transfer the call with On Hold status with other call, rollover the call and click Supervised Transfer as highlighted in the image below.
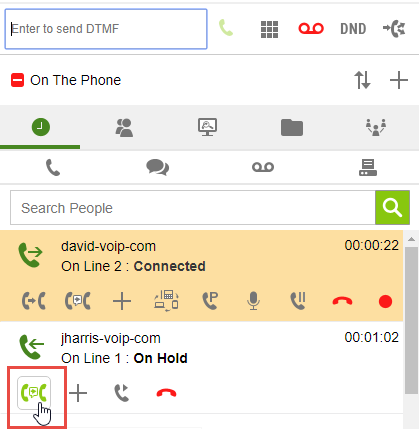
The call is transferred, and both calls in Recents disappear. The other two users are connected on call.
7. Mobile Call
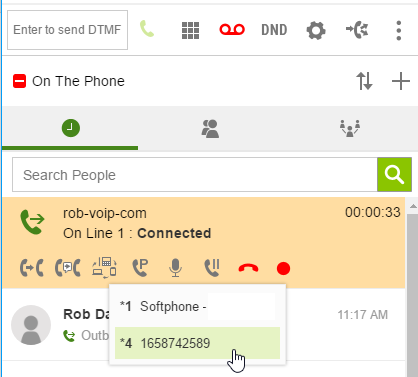
Mobile Call is a powerful feature added to Our Product communications to support users’ mobility. This feature allows users to switch calls on the fly between registered phones seamlessly, while keeping the call connected. Note: Users need to define Mobile Call Preference settings and numbers from User dashboard.
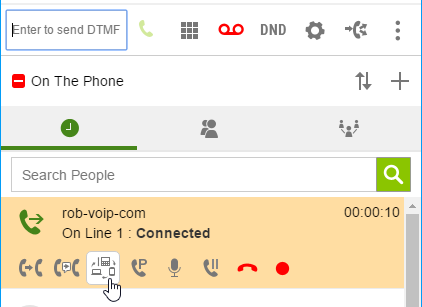
On clicking Mobile Call icon, the option menu to switch between your registered device is displayed as shown in the image below. Click the device to which you would like to switch the call. The call is connected seamlessly to the device selected.
8. Conference Call
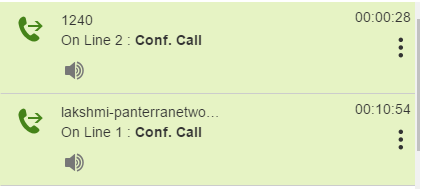
Conference call can be initiated between call with On Hold status and a Connected call. With this feature, you can control conference calls right away from the call panel in Our Product. To convert multiple connected calls to conference, click Conference icon (Plus) as displayed in the image below.

Clicking the plus icon merges the calls to a conference call as shown in the image below.
8.1 Conference Call Controls
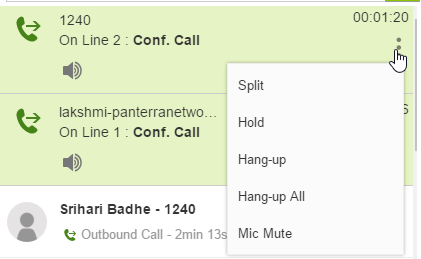
The actions that can be performed are splitting calls from Conference, hanging up a single call, or hanging up all the calls in the conference, adding a call to already existing Conference Call, ability to mute any attendee and moderator. Clicking 3-dots menu displays options as shown in the image below.
8.1.1 Split Calls in Conference
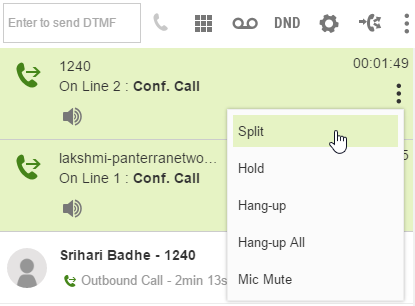
To split calls in conference, click Split displayed under the three dots menu from any of the conference call. This action splits calls and places calls in the previous state. On clicking Split, the users will be out of Conference and the calls are placed in the same state before merger.
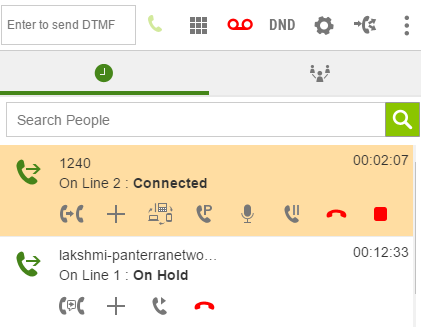
8.1.2 Hold Calls in Conference
To put the Conference Call on hold, select Hold displayed under the three-dots menu from any of the conference call.
To resume, select Resume displayed under the 3-dots menu from any of the conference call with 'On Hold' status.
8.1.3 Hang-up and Hang-up All
You can hang-up a selected/specific call/line in conference. Alternatively, if required you can also hang-up all calls in a conference in a single attempt.
- To hang-up a specific call, click Hang-up in the three dots menu.
- To hang-up all the conference calls, click Hang-up All in the three dots menu.
8.1.4 Microphone Mute
Moderator can self mic mute the call. On clicking Mic Mute from the menu, the voice of the moderator will not be transmitted to other users in the conference, but rest of the users will be able to communicate with each other.
9. Voicemail Notification
Whenever you receive a new voicemail, the Voicemail Icon changes to red color as shown in the image below. Click Voicemail icon to view the list of voicemails.

Clicking Voicemail icon displays voicemails in a new window as shown in the image below.

Select the voicemail to play. Rollover the Actions menu and select Play from the menu.

Voicemails displayed in bold indicate unread voicemails. From the menu,
- Select Stop to stop playing the voicemail.
- Select Download to download the voicemail. In the next screen, select the location to download the voicemail.
- Select Delete to delete the voicemail.
10. CTC Settings
The Click to Call Settings enables user to set a registered device as the default device to make a call.

As per the above settings, the Call From popup menu is always displayed when making a call as shown below.
11. Accessing ULM
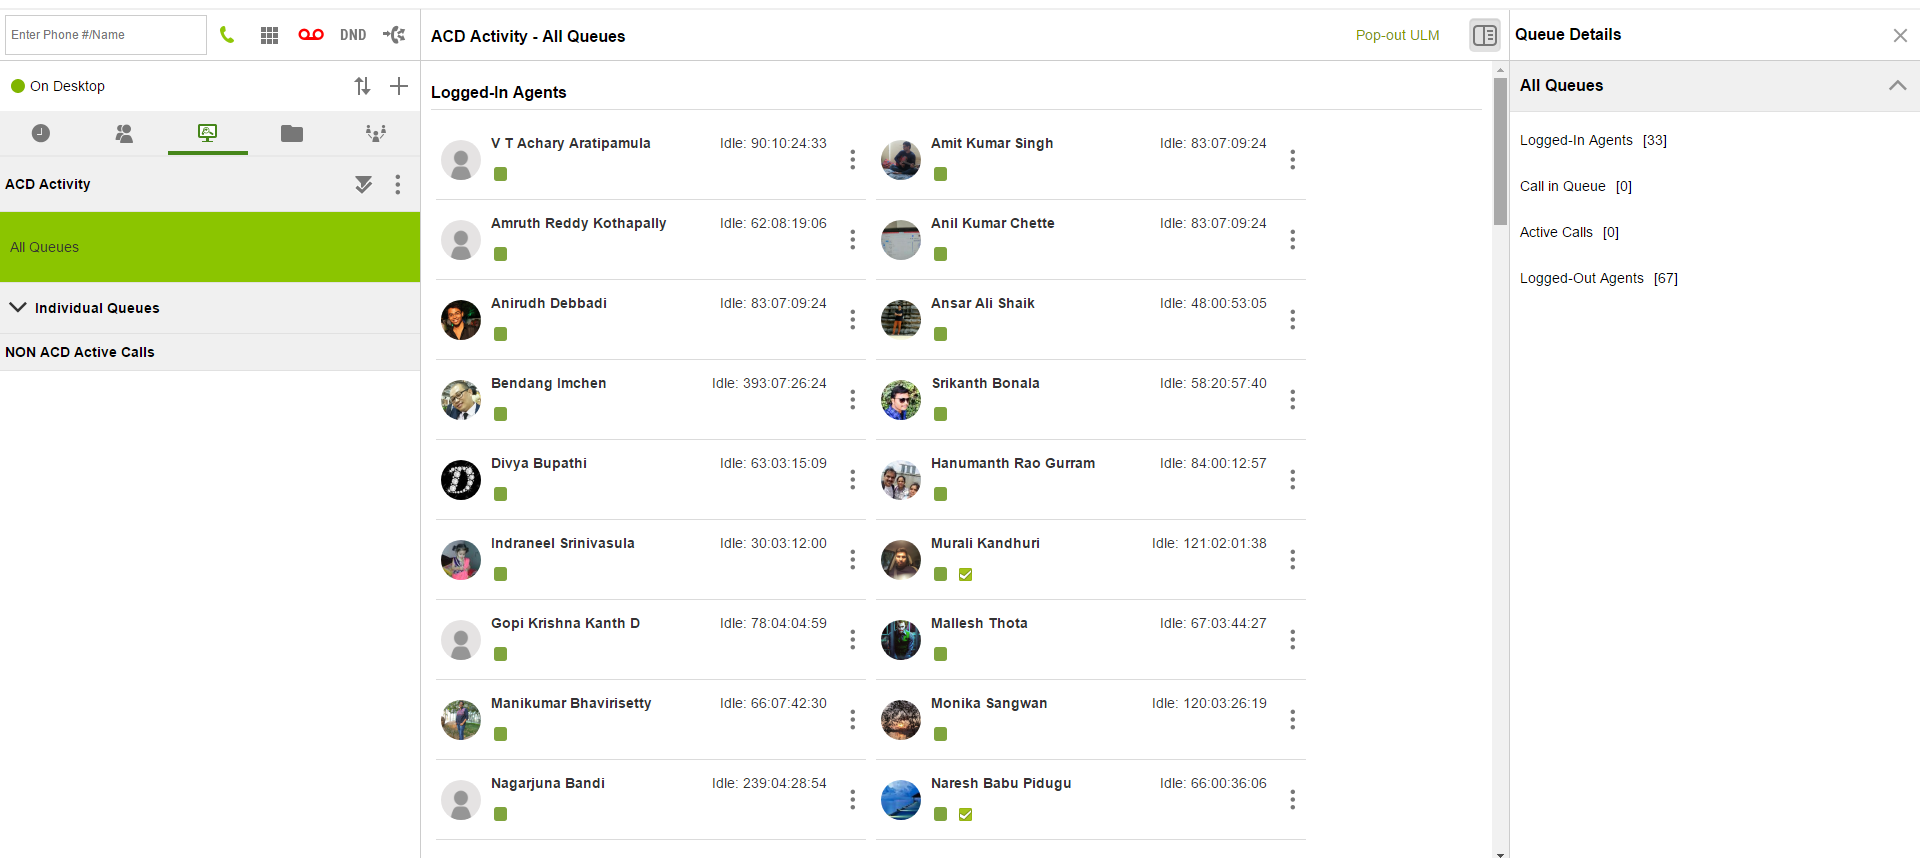
With Independent Unified Live Monitor, Supervisors can now monitor and supervise all activities happening, without logging into UCC. The Independent ULM is accessible from the three dots menu.
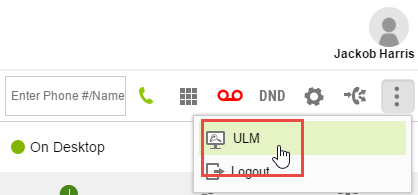
On clicking ULM, the Independent ULM is displayed in a new window as shown in the image below.
12. Contacts
Contacts tab displays Active calls, teams, company contacts, Other contacts and Imported contacts.

13. ConnectMe
ConnectMe tab allows you to initiate ConnectMe Audio and Video calls. You can also make and schedule conference calls with others or start already created sessions from ConnectMe tab. ConnectMe allows two online users to connect with other online users using Audio, Video, Screenshare and IM. The user initiating the ConnectMe session is referred to as Moderator and the user, to joins ConnectMe session is referred to as the participant.
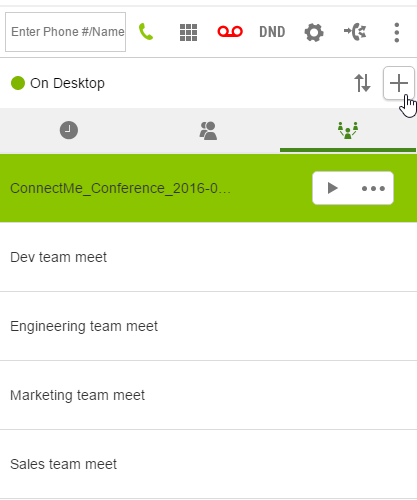
Clicking + button in ConnectMe tab opens ConnectMe window to create new session.
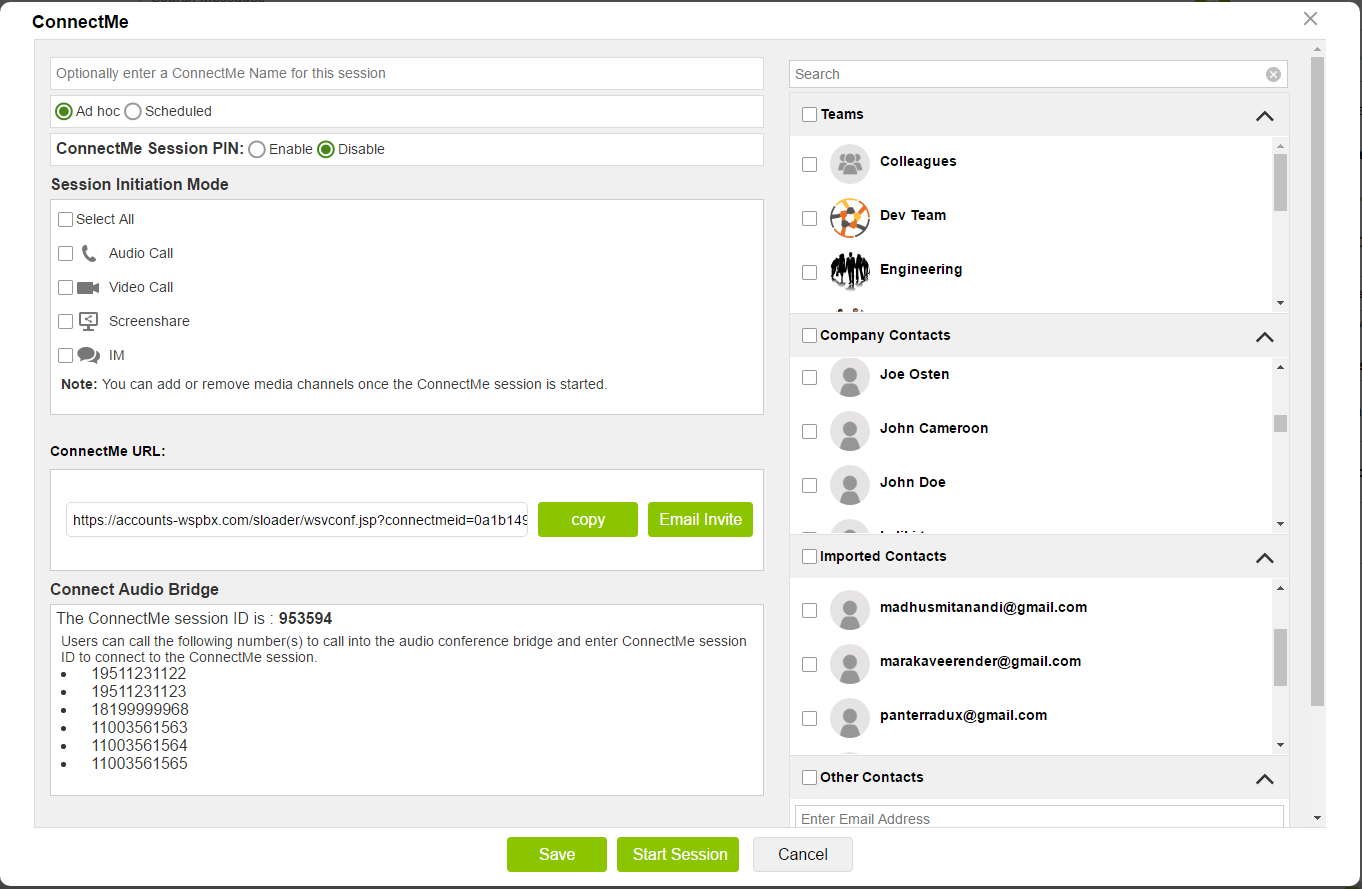
Adhoc ConnectMe video is to initiate ConnectMe video instantly with the added contacts. This session is valid forever. The same session can be restarted to initiate a ConnectMe video again at any time.
Scheduled type is to schedule a screenshare session to be initiated in future. In the Session Type section, select the type of session- Conference/1:1 (Moderator Initiated) or 1:1 (Remote User Initiated). By default, Conference/1:1 (Moderator Initiated) is selected. With this setting, Moderator need to initiate the session.
- Conference/1:1 (Moderator Initiated): This is a Moderator initiated conference or 1:1 session. Select the radio button corresponding to this when you want moderator to initiate the scheduled ConnectMe session.
- 1:1 (Remote User Initiated): This is a Remote user initiated 1:1 session. Select the radio button corresponding to this when you want a selected remote user to initiate the scheduled ConnectMe session. Once initiated, you can convert to a conference session.
- Optionally enter a title in ConnectMe Name field, which is available for others display. Select Scheduled to schedule a video to be initiated in future.
- In the Session Type section, select the type of session- Conference/1:1 (Moderator Initiated) or 1:1 (Remote User Initiated). By default, Conference/1:1 (Moderator Initiated) is selected. With this setting, Moderator need to initiate the session. Select Session Initiation Mode. The Session Initiation Mode enables the moderator to select the type of ConnectMe session to initiate. Selecting Video Call and Deskshare will initiate video call and also shares moderator's desk with selected viewers. Selecting the check box corresponding to Select All will enable all features.
- In Meeting Time,
- Select Start Time and End Time.
- Select Time Zone from the drop-down.
- From the Reminder drop-down, make a selection to send a reminder for the video call. E.g. If 5 minutes is selected from the drop-down, then a reminder is sent to all the added participants 5 minutes before the commencement of video call as shown below.
- Click Apply.
- UCC Contacts shows all OurProduct users group wise and Outlook Contacts, Global Contacts according to the First Name, Last Name settings selected in UCC from UCC Display Options. Select contacts to be added to the ConnectMe Video. You can also select any contacts from Outlook Contacts, Global Contacts. Select checkbox next to group name to select all contacts in that group. Note: UCC Contacts displays only the users of the group(s) selected in Manage UCC Groups. To invite other users, enter email id(s) in Other Contacts field and press Enter on keyboard after entering each email ID. Click Apply. To send a personal message to all invited contacts, enter the message in Send a personal message entry box. By default, Send a personal message is in collapsed mode. All selected contacts are listed in Invited Contacts. To remove any invited contacts, select the contact(s) to be removed and click Remove.
- Click Save and Invite to send invite to all added contacts.
- Click Manage Existing Sessions to view all active ConnectMe videos. The number in parenthesis is the count of all ConnectMe session created, other than deleted and deactivated sessions.
- Click Cancel to cancel creating scheduled ConnectMe session.
In ConnectMe settings window,